Showing posts with label 12 Months of Christmas. Show all posts

Tuesday, February 10, 2015

Nerdgasm: A collective of cross-stitch patterns for your inner nerd!

Well, yesterday's post got derailed by a string of doctor appointments, and one of my littles that decided to flush paper towels down the toilet resulting in a small pond in our downstairs. Lovely, right? Just how I wanted to kick off the week. Let's hope it can only get better from here! *knocks on wood*

But, as promised... I'm back with February's 12 months of Christmas project!


Any guesses as to what this might be?

Sometimes, I can whip through a cross-stitching project. Sometimes, not. So, the beginning of the year is a great time to get started stitching! This time, we're tapping into your inner nerd. We all have something we nerd out about, don't we? For some, it's Harry Potter. For others, like my husband, it's Star Wars. And, we all have that quirky person on our shopping list that is next to impossible to shop for. The perfect solution? A handmade gift honoring their crazy little obsession.

On my list, I have 1 super-hero fanatic, 2 Harry Potter nuts, 1 Star Wars freak, and 1 Lord of the Rings junkie. (There's a 12 Days of Christmas *Nerd Edition* in there somewhere.) Hahaha. And, trust me... there are cross-stitching patterns for ALL of them. I'm going to round up a few of my favorite sources here, and I hope that you'll stitch along with me!

If any of you guessed Harry Potter for the theme of my sample up above... you were right! I'll be working with this pattern from Cloudsfactory...


Cloudsfactory is probably my favorite for nerdist stitchery. They have some super-cute Doctor Who patterns to include this clock project. I never would have thought of turning one of my projects into a clock, but Doctor Who is a home-run for that idea. There are also Star Wars alphabets, dozens of Disney patterns, this Star Trek pillow, and even an obscure A Clockwork Orange pattern. Basically... anything your nerdy little heart desires, I can almost guarantee that Cloudsfactory has a pattern for it! I also couldn't resist purchasing this super-hero alphabet for the aspiring little Hulk on my list...


80's & 90's sitcoms more of your nerd-out thing? Tiny Modernist has some cute Golden Girls and Designing Women patterns. I love Tiny Modernist. She isn't just all nerdy patterns... you should really check out all the adorable patterns at her shop! 

Pixels In Stitches is a shop I just recently stumbled across while searching for a The Big Bang Theory pattern...


She also had a pattern of my favorite nerdy obsession: The Walking Dead. She also has a great selection of 80's and 90's cult classic movie samplers: Heathers, The Breakfast Club, and Empire Records to name a few. 

Didn't see anything here that caught your eye? Head on over to Etsy, and search out your nerdy treasure. You'd be surprised... they have cross-stitch patterns for almost ANYTHING nowadays!

As for me, I had better get back to stitching. I really wanted to finish this Harry Potter project by the end of the month. Although, I think that aspiration is a bit lofty. If you want to follow along, or participate in this nerdy cross-stitching adventure, use #nerdystitcher on Instagram (I'm charmedgirl). Can't wait to see you there!


 photo signature_zps305a7b69.png

Friday, February 6, 2015

Oh, my deer!

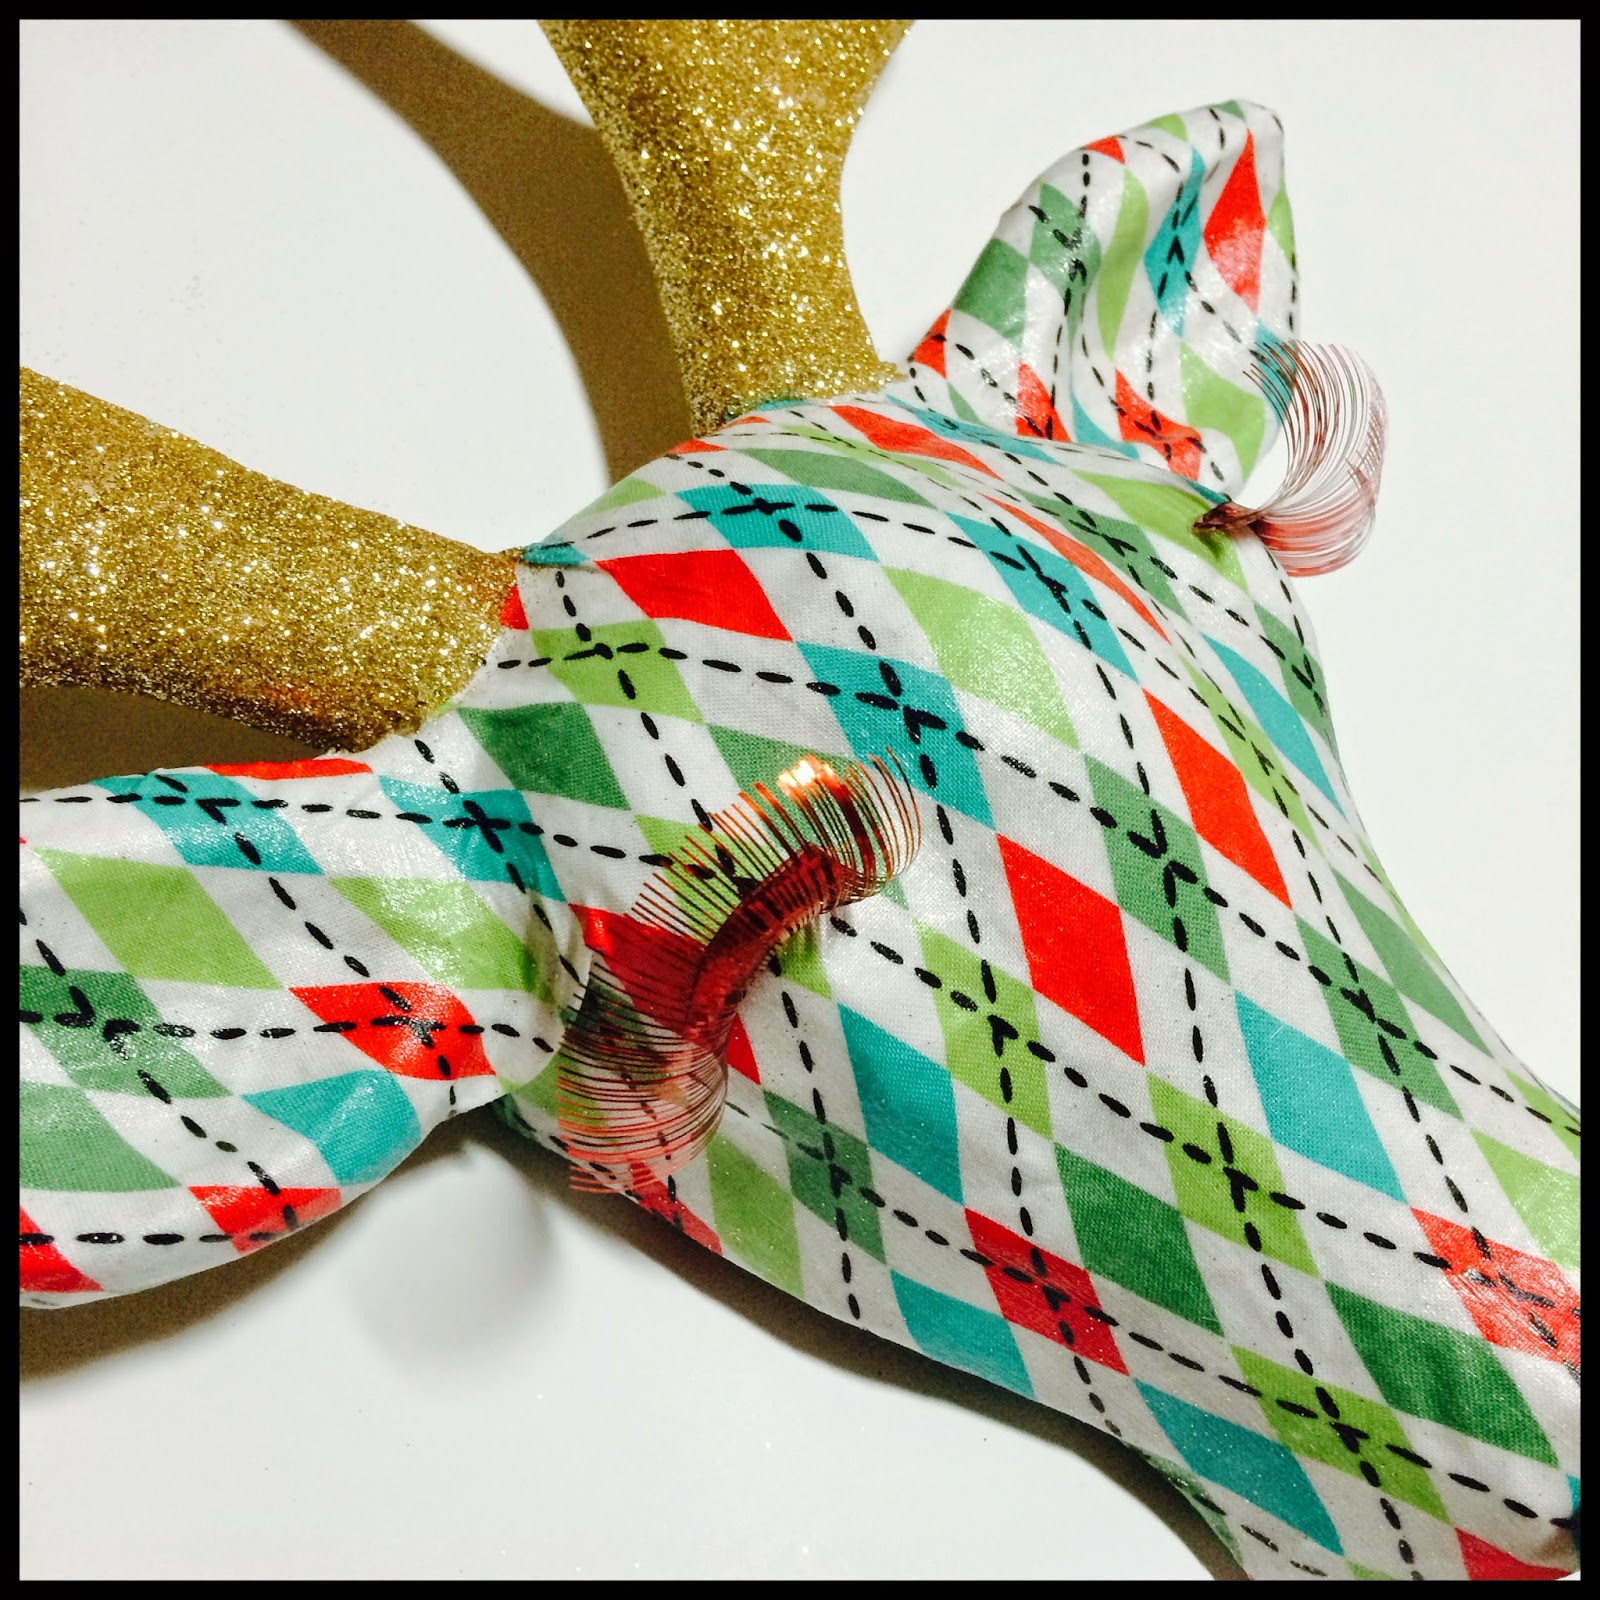
Well, this project took a little longer than expected. Between letting the Mod Podge and the glitter dry, and me nit-picking over every last detail... here we are two weeks later. Sometimes, I really prefer working under deadlines. It's one of the reasons I really miss being on design teams. Having a deadline forces me to make quick decisions, and move things along. When I'm just left to my own devices, my brain works a little something like this: Gold glitter. No, platinum glitter. Or, maybe antique gold glitter. No, gold. Or maybe BLUE. Yeah. That can go on for an hour. No joke. But, internal glitter arguments aside... here she is!


She didn't turn out exactly the way I had envisioned it in my head. It never really does, does it? But, I'm happy with her. I got the deer head when I visited my mom back in the fall. Michael's carries them. Or, at least the did. They're just made of the brown papier mache, and were with all of the boxes, bird houses, and project bases of that nature. We don't have a Michael's near us. The nearest one is in Nashville, an hour and a half away. And, it's not a good one. Hobby Lobby doesn't carry them, and I've scoured the internet to no avail. So, if anyone knows where to get more of these... hit me up! It's a really fun project. Let's get started!

Here is what you'll need...

Papier Mache Deer Head
1 Fat Quarter Worth of Fabric
Tape Measurer
Ruler
Disappearing Fabric Ink Pen
Pinking Shears
Micro Scissors
Fabric Mod Podge
Foam Brush
Martha Stewart Crafts Glitter Glue
Ultra Fine Glitter (I used Martha Stewart Crafts Fine Glitter in Florentine Gold)
Stiff Bristle Brush (Like A Stencil Brush)
False Eyelashes
Double-Sided Tape Sheet
1" Circle Punch
Brads
Black Diamond Stickles
1" Round Rhinestone
Ribbon
Hot Glue Gun

Step 1: Measure from the widest and tallest points of the deer head to figure our how much fabric you will need. I used a seamstress tape measurer so that I could form it to the shape of the head while measuring to assure there would be enough fabric. Mine measured 16" x 16".


Step 2: Iron your fabric so it's nice, and smooth.


Step 3: Measure, and mark off where to cut your fabric using your disappearing ink pen.


Step 4: Use pinking shears to cut out your fabric.


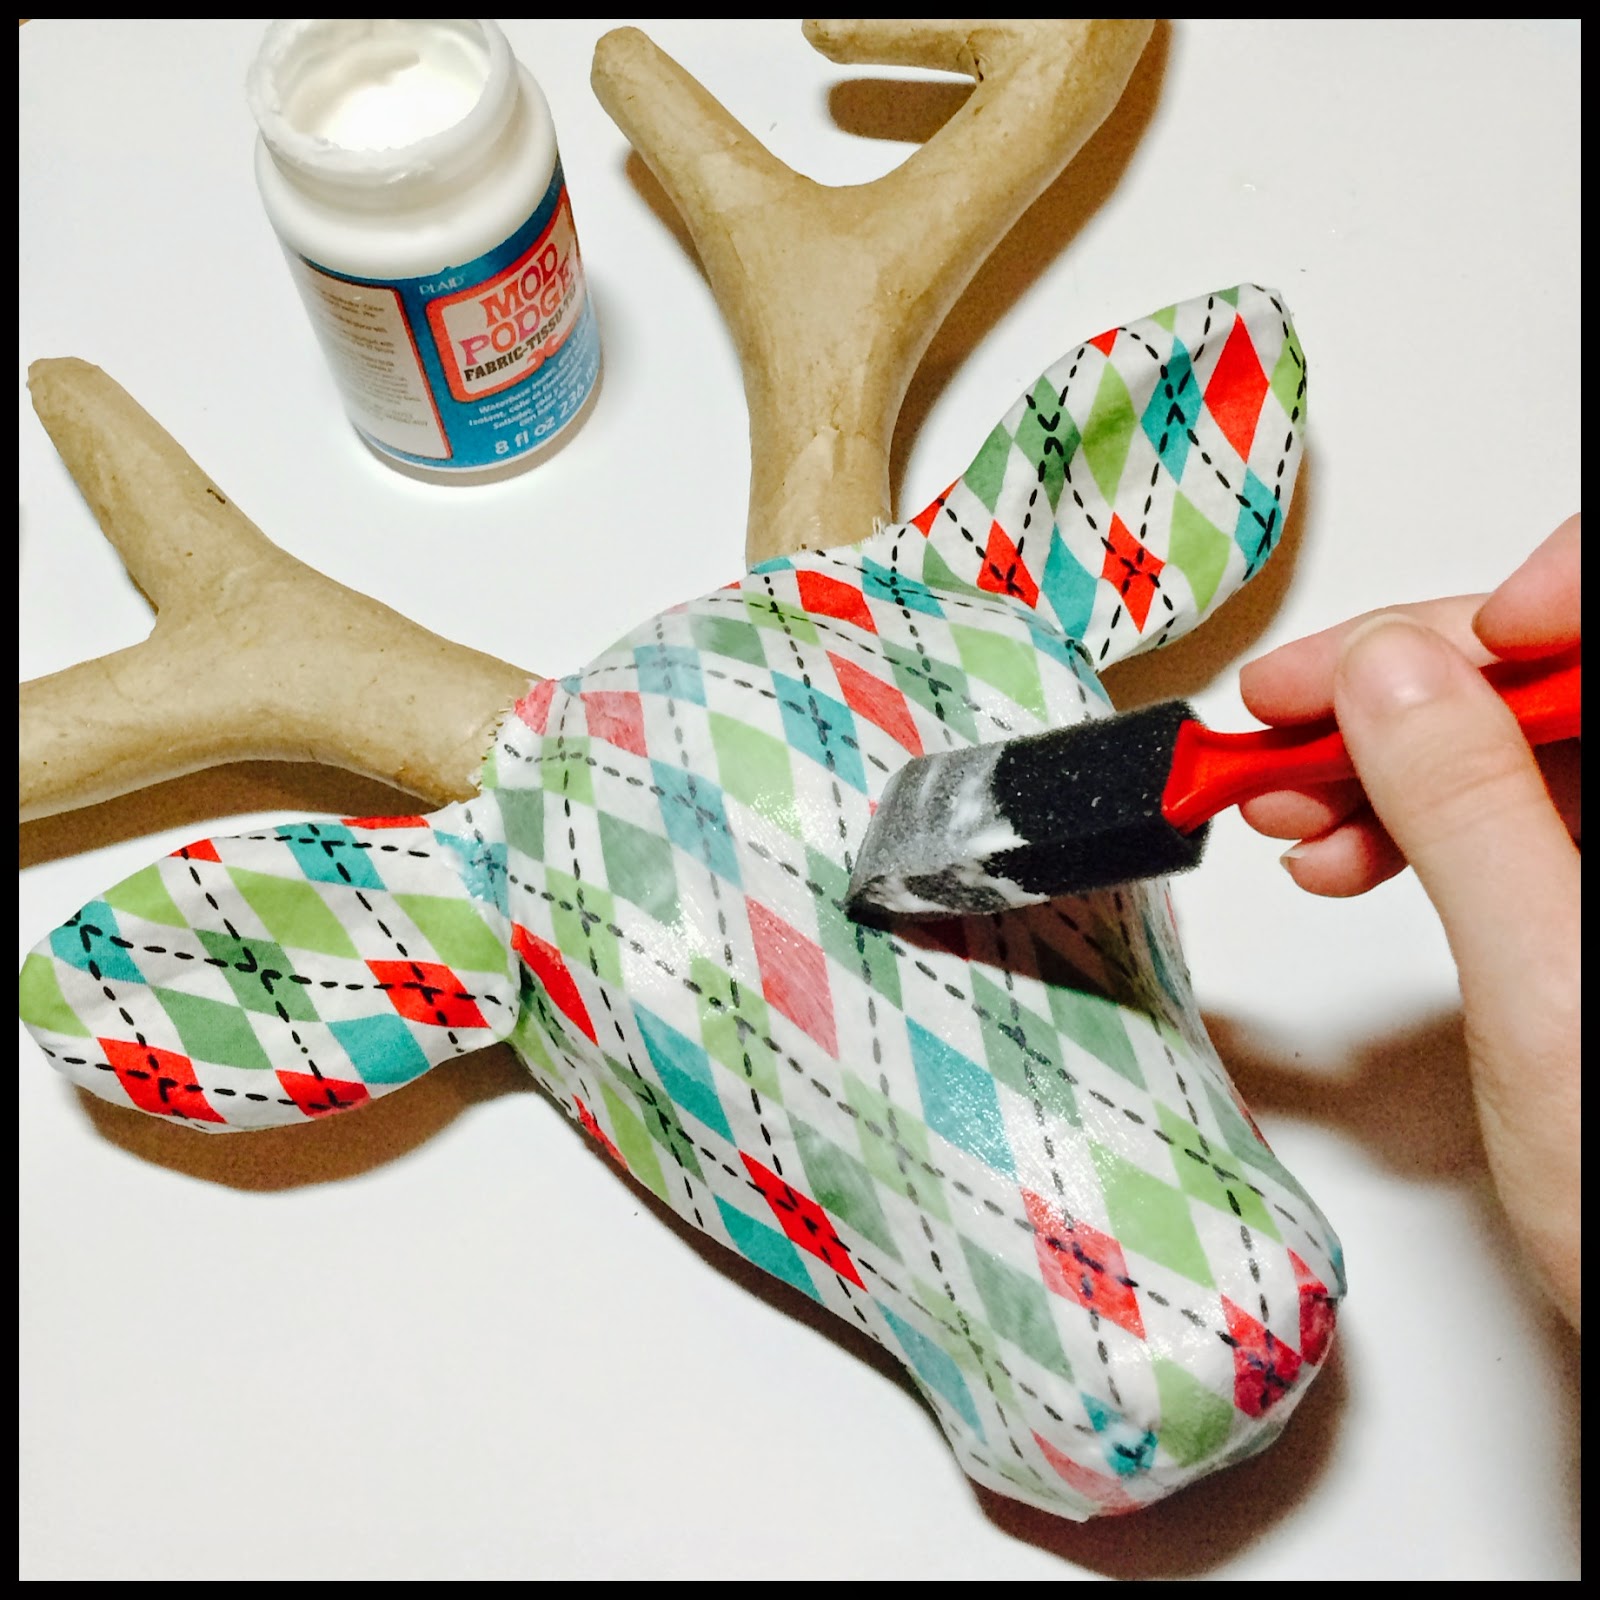
Step 5: Using a foam brush, apply a generous coating of Mod Podge to the area of your deer head that you want to start working. I began at the bottom of the nose.


Step 6: Adhere the fabric to the Mod Podge on the nose. Add more Mod Podge, and start working up the face. Stop around the bottom of where the ears begin.


Step 7: Apply Mod Podge to the sides of the face. Again, stop right around the bottom of the ear. Adhere the fabric.


Step 8: Once adhered to the sides of the face, use your pinking shears to make a diagonal cut from the edge of the fabric to the base of the ear. Repeat on other side. This allows your fabric a little give, and makes it easier to work the fabric to fit the form.


Step 9: Fold fabric into the back of the deer, and trim the excess fabric off. Leave about 1" worth of fabric to adhere into the back of the head.


Step 10: Apply Mod Podge to the back inside edge of the head. Fold fabric over, and adhere.


Step 11: Moving back to the front of the head... Make a neat little pleat in the fabric just underneath the ear. Secure with a little Mod Podge. This will neatly secure the extra fabric you will have in that area.


Step 12: Apply a generous layer of Mod Podge to the top of the ear.


Step 13: Adhere the fabric. Use your fingers to work the fabric into all of the nooks, and crannies until it is perfectly molded to the ear. I started referring to this as "fabric sculpting" because you really are working with it like you would clay... pinching, pulling, pushing until you get it formed into just the right shape! 

**Tip: Make sure your hands are extra clean! Some Mod Podge will seep through the fabric when you are working with it like this. And, that's okay! It dries clear, and we will be applying a sealing coat on top later on. But, if your hands are dirty, it will make the glue dirty. And, especially on this white fabric... you WILL notice. I washed my hands several times during the process of working with the ears. Anytime I felt there was a build-up of glue on my fingers, I would make a trip back to the sink.**


Step 14: Once you are satisfied with the front of the ears, turn the head over. Trim around the edge of the ears using micro scissors. I left about a 1/2" lip that will adhere over the edges of the ears.


Step 15: Use your fingers (the foam brush is too big to work in this area) to apply Mod Podge to the edge of the ears. Adhere the fabric.


Step 16: Use the micro scissors to trim the fabric around the base of the antlers. DOn't worry if it isn't exactly perfect, or frays a bit. We will be covering it up with glitter later. 


Step 17: Trim, and fold the remaining fabric until it fits neatly between the antlers with a 1" lip to tunk under, and secure inside the back of the head. Apply Mod Podge, and adhere fabric.


Step 18: Admire your work so far! Your deer head should look something like this. Set it aside, and let dry for 24 hours.


Step 19: Apply your sealing coat of Mod Podge. Let dry for at least 24 hours. I found mine to still be a bit tacky after than, and let it dry for a total of 48 hours. When dry, it should have a texture similar to oil cloth. You don't want it to be tacky AT ALL because next we will be applying glitter to the antlers, and you don't want that getting stuck in Mod Podge all over the face.


Step 20: Get ready to apply the glitter to the antlers. Martha Stewart glitter glue is my favorite to use for projects that require large areas of glitter application. It comes with a brush already inside the lid. Michael's carries it. But, you can also get it here.


Step 21: Apply glue to the top area of the antlers. You can work in patches, so that the glue doesn't dry out. 


Step 22: Sprinkle glitter over glue-covered area. Repeat until antlers are completely covered in glitter. Allow to dry for 24 hours.


Step 23: Once dry, use a really stiff bristle brush (I like to use a stenciling brush) to brush off any stray bits of glitter on the face of the deer.


Step 24: Now we can start constructing the face of the deer. I selected these pretty tinsel eyelashes. Originally, I had ordered silver. They sent me red. It was too much hassle to return them, so I just hung onto the red ones. I'm glad I did! They worked better than I believe the silver would have. Trim about 1/4" off of each eye so it will fit to the form.


Step 25: Use a tiny dot of hot glue at the corners of the lashes to adhere them to the head. This is one of my nit-picky things that took me FOREVER to get them exactly where I wanted them. So, be patient.


Step 26: Use your 1" circle punch to punch out 2 circles from the tape sheets. Or, if you're like me, and the movers lost your box of punches... use a 1" circle stencil to draw them, and cut them by hand. I have hoarded my Art Accentz Terrifically Tacky Tape sheets for years. They don't make them anymore. But, I imagine these tape sheets from Ranger would work just as well.


Step 27: Peel off one side of the backing. Sprinkle glitter over the exposed sticky tape, and use your fingers to make sure it is generously well-adhered. Repeat for both circles.


Step 28: Peel off the other side of the tape, and adhere under the eyelashes on the deer head.


Step 29: Select some brads that you like. These are black pearl brads that are rimmed in silver. I've really been trying to de-stash so these are old. They're from the My Mind's Eye "Lush" collection. They're discontinued, but there are plenty of other companies that put out brads similar to these. Or, hey... dig through your stash! Take your micro scissors or a pair of wire snips, and cut off the prongs on the back of 2 brads so that the back is now flat. 


Step 30: Use a dot of hot glue to adhere the brad to the glittered "eyeball." Repeat on second eye.


Step 31: The eyes didn't have quite the doe-eyed affect that I was looking for. So, I rimmed them with some black Stickles.


Step 32: Use a dot of hot glue to adhere the rhinestone nose.


Step 33: Tie a bow with some pretty ribbon. Use a dot of hot glue to adhere it to the top of the head.


Step 34: Stand back, and admire your craftiness!


This project allows for so many personal tweaks: fabric selection, glitter colors, etc. I even considered using some ribbon to hang some Christmas balls from her antlers, but decided against it. But, you can really get creative with these deer heads!

While my design is decidedly Christmasy, yours certain doesn't have to be. But while we're on the subject... a few years ago I did a fun project that ran all year long on the blog: "12 Months of Christmas." So, why don't we give it a go again in 2015?

I know a lot of us crafters are big into giving handmade gifts during the holidays. And, if you're anything like me, you'll come up on November faster than you can bat a red tinsel eyelash. Inevitably, you'll have a long list of gifts you want to make with not enough hours until Santa comes a knockin' to make them. The idea here is to knock out a gift a month throughout the year. It makes the holiday time SO. MUCH. EASIER. And, who doesn't need their holidays simplified in one way or another? So, my sweet little deer will be January's installment for the 12 months of Christmas (although it's a few days past January... darn those days spent waiting on that Mod Podge to dry)! Hahaha!

If you make a deer head... or even if this project inspires you to try another papier mache project... post them up in the comments! I'd love to see them. I'll be back on Monday with February's project for the 12 months of Christmas. See... I didn't let those hours of waiting on glue to dry go to waste... I just started on the next project!

 photo signature_zps305a7b69.png

Monday, November 9, 2009

A Home for the Holidays

Head on over to the Bad Girls blog today to check out some more holiday crafting inspiration that in have in store for you! A fabulous vintagey waterless snowglobe project...


Full instructions for this project can be found here.

Also, I have entered my American Crafts paper flower wreath into the Michael's "Handmade Holiday" contest. The grand prize is a trip to NYC, and tickets to the Martha Stewart Show. So, if you could please, take a moment to head on over to the contest gallery and vote for my wreath. I would REALLY appreciate it. :0) Just click on the snowmen under the photo of the wreath to cast your vote. It won't look like it's actually registering your vote... nothing will happen when you click on the snowmen. But, rest assured, it IS actually working. Again, thank you so much for taking the time... and a BIG THANK YOU to everyone who has already voted!

Happy holiday crafting to you! Enjoy!

Thursday, November 5, 2009

Deck the doors!

In the process of writing up a tutorial for my paper flowers technique, I was trying to think of unique was to incorporate them into a project. And, like a lightning bolt, it hit me... these would make an AWESOME Christmas wreath. Then, when I discovered that the American Crafts "Flair!" was the p.e.r.f.e.c.t. size to cover the brads in the center of the flowers... it was like the crafting gods had their divine intervention!


What you will need...

For the wreath base:
*One 18" styrofoam wreath
*16 yards of ribbon to wrap the wreath base with (all my ribbons are the American Crafts holiday line sold at Michael's in individual 3 yard rolls... you'll need 6 rolls)
*One roll of extra-wide wired ribbon for the bow at the top of the wreath
*Picture hanging wire
*Hot glue gun

For the flowers:
*One sheet each of 6 different styles of patterned paper (all papers and other products here are from the new American Crafts holiday line)
*24 large brads
*24 rubberbands (I use the colored rubberbands you can buy for children's hair at the grocery store... don't worry about the colors b/c you won't see them)
*Glue dots
*3 packages of American Crafts holiday Flair! (coincidentally, there are 3 different set of Flair! with 8 designs per package. That equals 24 pieces of Flair!... which is exactly how many flowers you will need. See, I told you... divine intervention of the crafting gods!)

Start out by wrapping the wreath with ribbon, securing along the way with hot glue. Ideally, it would be great if you could get 6 rolls of the same ribbon. However, if your Michael's is as small as mine, you will only be able to get 2 of the same design. It's not that big of a deal. You won't really see it anyway when the wreath is done... unless you're looking at it from the side. And who really looks at it like that if it's on your front door? Not me. Anyhow, wrap the wreath...


Set the wreath aside, and start working on your flowers per the previously mentioned tutorial. Each sheet of patterned paper will provide you with (4) 5" squares to make flowers from. Once you have the basic flowers assembled, glitter the edges of them with glitter glue. Usually, I'm the biggest Stickles advocate, but in this case... I used the cheap stuff from Michael's. Trust me... you'll need that big bottle, and it gets a thicker line of glitter that is preferable for this project...


Then, add your Flair! to the middle of the flowers, and you'll be done with them. Now, all you have to do is adhere them to the wreath base using hot glue. I overlapped them so that none of the ribbon below was visible. This will leave you with a gap at the top, but that's okay because we're going to cover it up with that pretty bow! Just tie a simple bow from a 2' length of extra-wide wired ribbon, and trim the ends. Secure the bow to the wreath with more hot glue, and run a length of picture wire through the back of it to provide a hanger for your wreath. Voila! Now, you've got a beautiful wreath that will greet your guests at the front door year after year.


**THANK YOU so much to all of the ladies over at 2Peas that voted for my wreath... #1 by votes in LESS THAN 45 minutes! That's just freaking amazing. And, layout of the day to boot! Thank you!!! xoxoxo, Holly**

Sunday, September 13, 2009

Not too Shabby...

I am so honored to have been asked to be the September guest designer over at Shabby Chic Crafts! Veronica has some of the most gorgeous tags... lots with that lovely vintage look that is becoming so sought-after in the scrapbooking community these days! I had so much fun creating with them, and would love to share some of my projects with you!

First up, a layout about Hazel's first day of school made using theWood Grain Tags (one of my absolute FAVORITES), a Vintage School Card, one of the Vintage School Circles, and lots of yummy Cosmo Cricket and Sass goodies!


Next up: my December Daily journal for this year! It feels like such an accomplishment to have it done so far in advance, and the Shabby Chic Crafts tags were the perfect addition to this colorful album! I used one of the Creative Imaginations Easel Frame Albums for this, and I love that it has the easel back that pops out so that my book can stand up, and be displayed throughout this holiday season! Plus, lots of last year's KI Memories Christmas goodies...


And my final project... a 2010 calendar (and this month's 12 Months of Christmas project)! This is a super easy gift to make for a family member, and can easily be completed in an evening or two. It uses up lots of those scraps you have lying around, and its creative possibilities are endless! (If you're my mom, and happen to be reading this, now would be a good time to avert your eyes... unless you want to spoil one of your Christmas gifts). ;0)


For my calendar, I used 2 pieces from an older Maya Road acrylic album. The pieces are thick enough that they support the calendar on their own when stood open. The covers are adorned with buttery Hambly rubs, some teensy Thickers, and a Vintage Label. For the insides, I trimmed lots of colorful Hambly scraps to fit, using a corner rounder punch to finish them off. Then, I added a photo of the kids to each calendar page. I tried to print a picture from this year (or last) that was taken during the month that it represents on the calendar.


For the calendar itself, I not only wanted a tiny little calendar, but a place for the recipient to add little notes each month. So, to accomodate that wish (and to add some extra color), I actually combine two Shabby Chic Crafts calendar tags! I used the Vintage Note Calendars for the base. Then, I trimmed the edges off of the Square Stamp Calendars, and added them on top of the calendar that was printed onto the Vintage Note Calendar tags (the calendar is the same size).


You can use tiny pearls and gems to mark special dates (i.e. birthdays, holidays, etc.) on the calendars. And, for some added decoration, you can add some tiny flowers centered with more gems. This is a great way to use up all those jars of tiny Prima flowers I'm sure you have lying around!


To bind the calendar together, I punched holes at the tops of each calendar page and reenforced them with some... wait for it...

EYELETS!

See, I told you this was a great way to use up your supplies! I'll bet you haven't played with eyelets in years, huh? To be honest, it was kind of fun to break out the hammer and setter, and pound away! To put the whole calendar together, I used some earring hoop findings. Binder rings aren't thin enough to go through the eyelets, so earring hoops it was!

It was such a fun project to make, and I hope you'll give it a go! It makes a quick check-off on your Christmas list too. ;0)

A big thanks to Veronica at Shabby Chic Crafts for having me as their guest designer this month! Please check out their blog, and leave a comment here for a chance to win some fabulous fall tags (she's leaving the contest open for a couple extra days, so there's still time)!